
Windows 11 Kaise Install Karein — Step by Step + 5 Common Errors Fix
Windows 11 install karna mushkil nahi agar sahi tarika pata ho. Yahan complete guide hai — bootable USB se lekar common errors tak — repair expert ki zabaan mein.
Windows 11 fresh install karne se pehle data backup lein, BIOS mein TPM 2.0 aur Secure Boot enable karein, aur GPT/MBR ya driver errors ke liye step-by-step fix follow karein.
Computer repair ke kaam mein roz Windows install karna padta hai. Kabhi kabhi customer ka system anda anda hai, kabhi virus hai, kabhi sirf slow hai. Windows fresh install sabse reliable solution hai.
Lekin Windows 11 mein kuch naye requirements hain jo pehle nahi thay. Agar in ka pata na ho to installation ruk jaata hai. Is guide mein woh sab cover hai.
Windows 11 Ke Liye Minimum Requirements
Pehle check karo ke aapka computer compatible hai ya nahi:
- Processor: 1 GHz ya ziyada, 2 ya ziyada cores, 64-bit compatible
- RAM: 4 GB minimum
- Storage: 64 GB free space
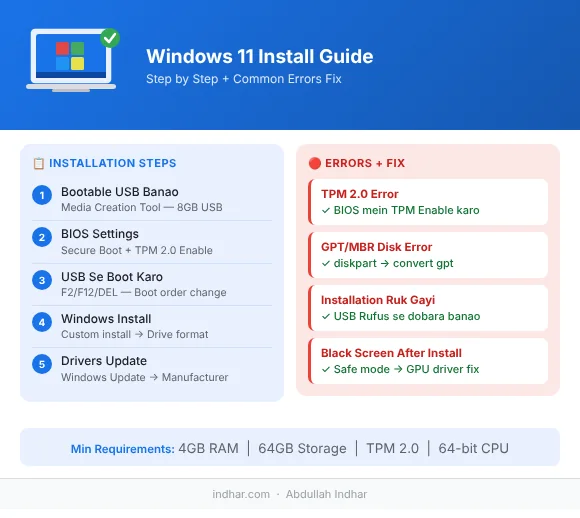
- TPM: Version 2.0 (yahi sabse common issue hai)
- Secure Boot: Enable hona chahiye
- Display: 720p minimum, 9 inch ya bada screen
Step 1: Bootable USB Banana
Kam az kam 8 GB ki khaali USB drive lein (us mein jo bhi data hai woh delete ho jaayega):
- 1.Microsoft ki official website (microsoft.com/software-download/windows11) se Windows 11 Media Creation Tool ya ISO file download karein
- 2.Agar Microsoft ka tool use kar rahe ho to run karo, USB flash drive select karo aur process complete hone do
- 3.Agar ISO download ki hai to Rufus tool download karke open karo aur apni 8 GB USB select karo
- 4.Rufus mein Partition Scheme GPT aur Target System UEFI select karo (yeh purane systems aur naye errors dono se bachata hai)
- 5.Start pe click karo aur 15-25 minute wait karo jab tak bootable USB ready na ho jaaye
Step 2: BIOS Settings
USB se boot karne ke liye:
- 1.Computer restart karo aur shuru hote hi F2, F12, DEL ya ESC key bar bar dabao (Dell mein F2/F12, HP mein F10/ESC, Lenovo mein F2/Fn+F2)
- 2.BIOS menu khulne ke baad Security ya Advanced tab mein jaao
- 3.TPM 2.0 (Intel mein PTT aur AMD mein fTPM ke naam se hota hai) ko Enable karo
- 4.Boot ya Security tab mein Secure Boot ko Enable karo
- 5.Boot Priority / Boot Order mein USB Flash Drive ko sabse upar rakho
- 6.F10 daba kar Save & Exit karo — system ab USB se restart hoga
Step 3: Windows Install Karna
- 1.Screen pe "Press any key to boot from USB" aaye to koi bhi key dabao
- 2.Language aur Keyboard layout select karke Next karo, phir Install Now pe click karo
- 3.Product Key pooche to "I don't have a product key" click karo (baad mein Microsoft account ya digital license se activate ho jaayegi)
- 4.Apna edition (Windows 11 Home ya Pro) select karke terms accept karo
- 5.Upgrade ki jagah Custom: Install Windows only (advanced) select karo
- 6.Apni C: drive ya purane system partitions select karke Delete/Format karo (D: aur E: drives ko mat chhedo jahan data rakha hai)
- 7.Unallocated Space select karke Next dabao — Windows files copy aur install hona shuru ho jaayengi
- 8.15-20 minute baad jab PC pehli baar restart ho to USB nikal lo warna setup dobara shuru ho jaayega
Step 4: Initial Setup
Install ke baad:
- Region (Pakistan) aur keyboard layout (US) select karein
- Wi-Fi ya Ethernet connect karein — agar offline setup karna ho to Shift + F10 dabakar
oobe\bypassnrocommand chalayein - Apna user account aur PIN set karein aur privacy toggles apni pasand ke mutabiq off/on karein
- Desktop aane ke baad Settings → Windows Update check karein taake saare zaroori drivers khud download ho jaayein
- Graphics aur chipset ke liye laptop/motherboard manufacturer ki official site se latest drivers install karein
5 Common Errors Aur Fix
1. "This PC can't run Windows 11" (TPM 2.0 Error) Fix: BIOS mein jaakar TPM 2.0 (Intel PTT / AMD fTPM) aur Secure Boot enable karein. Agar purana CPU hai aur testing ke liye install karna ho to Rufus mein "Remove requirement for 4GB+ RAM, Secure Boot and TPM 2.0" checkbox tick karke USB dobara banayein.
2. "Windows cannot be installed to this disk. The selected disk has an MBR partition table" (GPT/MBR Disk Error)
Fix: Setup screen pe Shift + F10 dabakar Command Prompt kholein. Phir yeh commands likhein: diskpart → list disk → select disk 0 (apna disk number check karein) → clean → convert gpt → exit. Dhyan rahe: clean command poori drive ka data mita deti hai, isliye pehle backup zaroor lein.
3. Installation 60-80% Pe Ruk Gayi Ya File Missing Error Aaya Fix: Aksar USB port loose hone ya corrupt ISO ki wajah se hota hai. Microsoft ki official site se fresh ISO download karein, Rufus se USB dobara banayein, aur PC ke pichhle (motherboard) USB port mein lagayein.
4. Install Ke Baad Black Screen Ya Resolution Kharab Aa Raha Hai Fix: Windows restart hone ke baad Power button dabakar Safe Mode mein boot karein, Device Manager kholkar purana Display Adapter driver uninstall karein, aur Intel/NVIDIA/AMD ka official GPU driver install karein.
5. Wi-Fi Ya Touchpad Setup Mein Kaam Nahi Kar Raha Fix: Naye laptops ke network aur storage drivers Windows 11 ISO mein pehle se nahi hote. Doosre phone ya PC se laptop model ka Wi-Fi driver USB mein copy karein, ya Android phone ko USB tethering se connect karke Windows Update chala lein.
Pro Tip: Data Backup
Install se pehle hamesha backup lo:
- Desktop, Documents aur Downloads folder C: drive mein hote hain — inhein D: drive ya external USB mein copy kar lein
- Browser bookmarks, WhatsApp Web sessions aur important passwords export ya save kar lein
- Agar system boot hi nahi ho raha to USB se boot karke Shift + F10 →
notepad.exekholein aur File → Open se apna zaroori data doosri drive mein copy kar sakte hain
Kab Windows 11 Ki Jagah Windows 10 Use Karein
Agar aapke computer mein sirf 4 GB RAM hai, purana Core 2 Duo / 3rd-4th gen processor hai, ya SSD ki jagah purani HDD lagi hai, to Windows 11 lag karega. Aise system pe Windows 10 ya SSD upgrade behtar option hai — jab PC slow chale to naya OS daalne se pehle hardware check karna zaroori hai.
Hamare electronics repair tools aur Windows 11 setup guide se aap khud step-by-step practice kar sakte hain. Koi sawal ho to contact page par message bhej dein.
Have a mobile app, web platform, or AI idea?
Discuss your ideas or ask a question directly with Abdullah Indhar.